A while back one of our printer forum members submitted the article “Canon i960 Printer Cover & Base Removal”. Another one of our community members, wfmcg, replied that he had created a Canon i960 teardown document with pics. I asked if he’d be willing to send it to me, and did. I was impressed and asked permission to post, so here it is:
Canon i960 Waste Ink Tank Pad Replacement
Important!: First Please read this note at the bottom of the pagebefore starting.
To start the tear down, observe unit for any tab release holes.
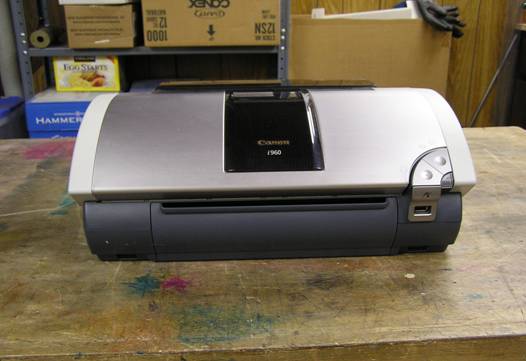
Figure 1
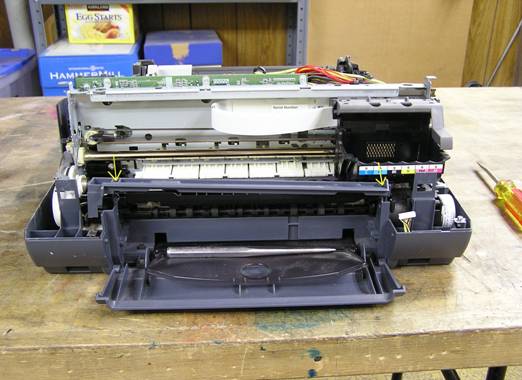
In this demonstration, notice that I have removed the print head.This was because the pigmented black had become badly clogged.While I was soaking it in a shallow bath of 50% Clear Ammonia and 50% Distilled Water for a couple of days, I decided to clean out the wastetank absorbent pads.While I went through the shut down procedure, which parked the print head carrier,It would be easier to unplug the printer while the carrier is still in the middle, at the“change ink cartridge†position. That way you will have more room to remove thesquare “stone†below the print head for cleaning.You can see the square stone with the ink still in it in figure 22,while in figure 20 you can see it after it’s been cleaned.(I had to re-take figure 20 for clarity.)
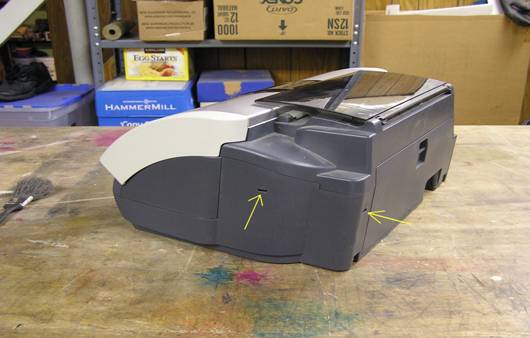
Figure 2
Notice the two release slots. One on right side and one on right rear.Use thin screwdriver to push in locking fingers.
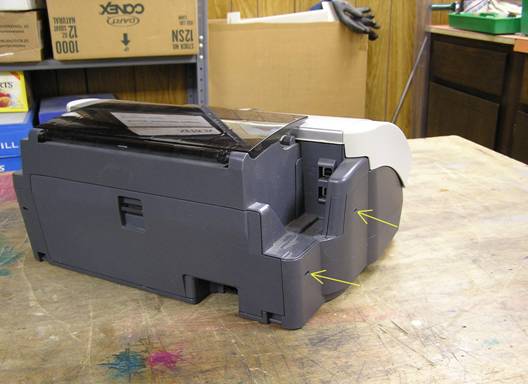
Figure 3
Two release slots on left side, front and rear.
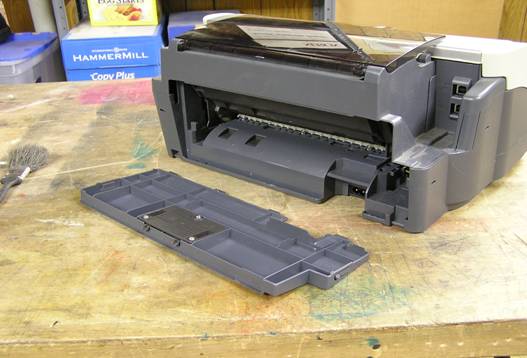
Figure 4
While we’re back here remove paper jam door.
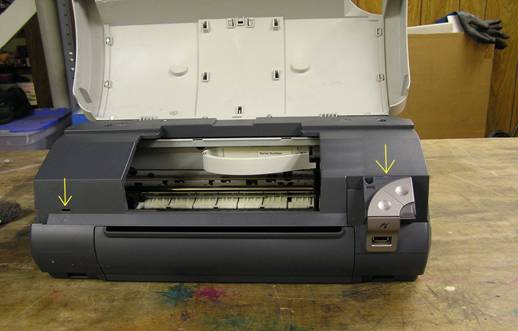
Figure 5
Two more release slots. One on the left front and one behind the start button console.
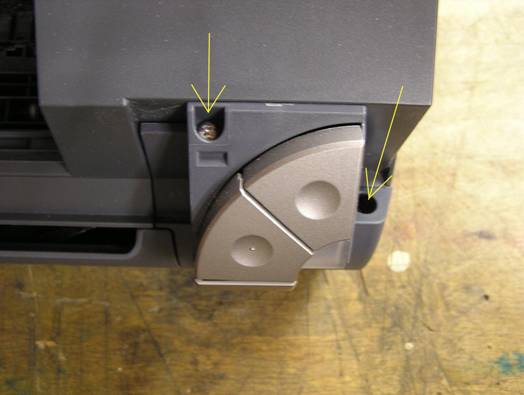
Figure 6
Remove the two screws from the start button console.
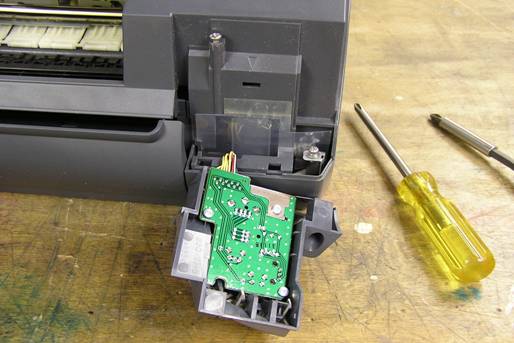
Figure 7
I like to replace the screws into their sockets so they don’t get lost.
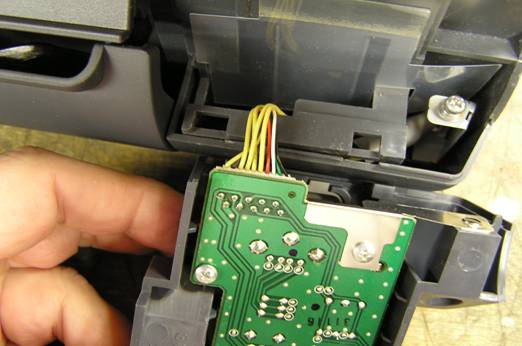
Figure 8
Next, gently remove the multi-wire connector.
Figure 9
After releasing all the locking fingers, gently remove the top.
Now push on the small locking fingers in the top of the spreader bar and remove.
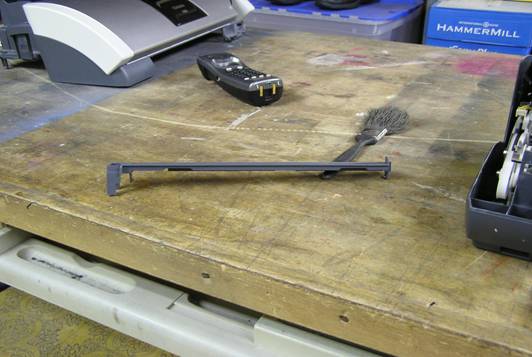
Figure 10
Set the spreader aside in a safe place. 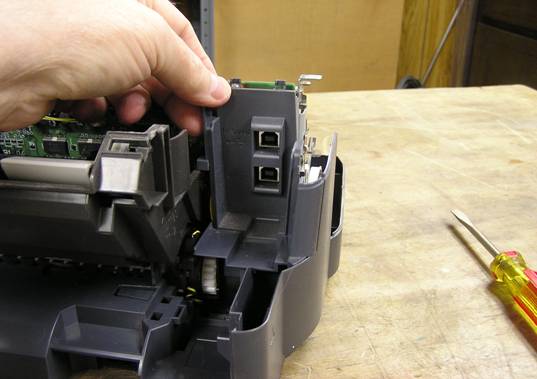
Figure 11
Remove the now loose USB cover plate. 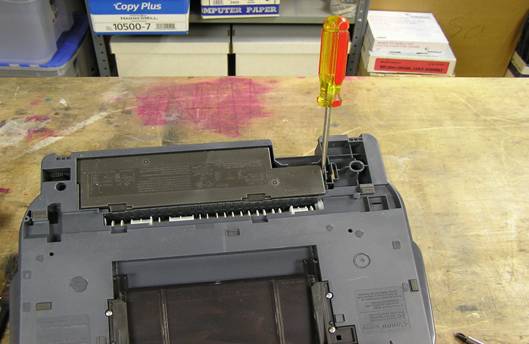
Figure 12
Flip unit over, being extremely careful not to damage the mylar location disc and location strip.Use flat screwdriver to release power supply locking clip.
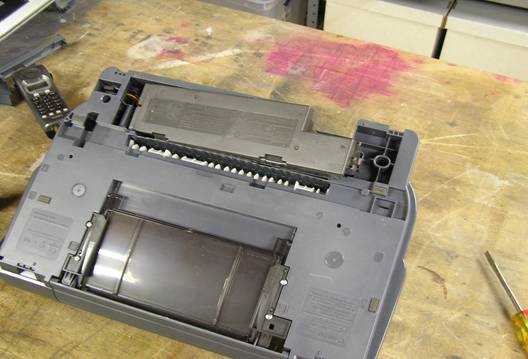
Figure 13
Pop up right side and pull to the right.
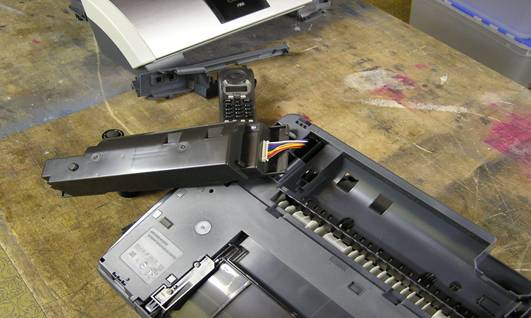
Figure 14
Flip power supply over and gently unplug multi-wire connector.
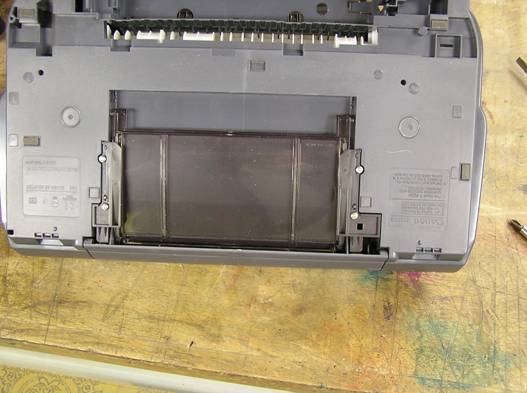
Figure 15
If desired, the lower paper tray may be removed with these four screws.
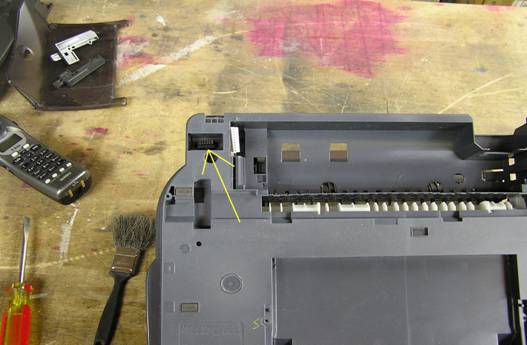
Figure 16
Find the diagnostic connector in a well at the rear of the bottom of the base.
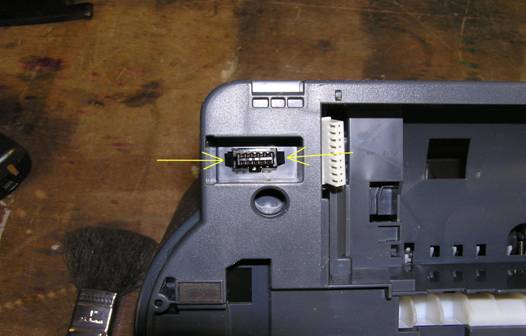
Figure 17
Use a small screwdriver to push in on the clips and push through hole in base.
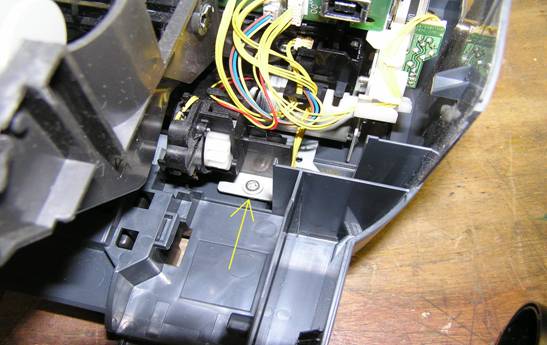
Figure 18
Remove left rear interior mount screw
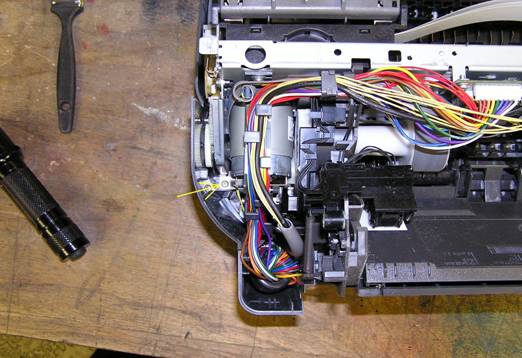
Figure 19
Remove right rear interior mount screw
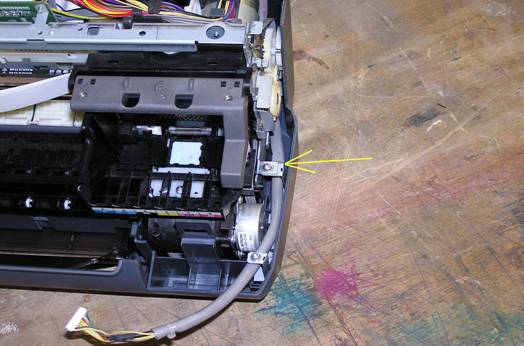
Figure 20
Remove right front mount screwLeave clip attached to base for now.
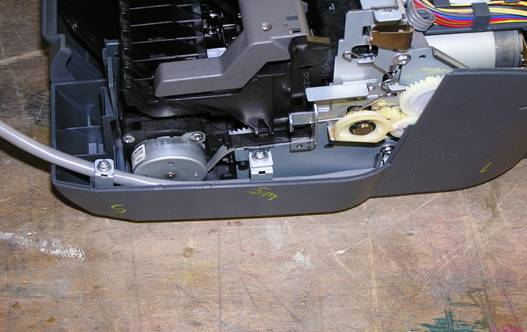
Figure 21
I like to leave myself notes as to the location and sizes or lengths of the screws I have removed. Notice the yellow letters. s=short, l=long, sm=short machine thread.
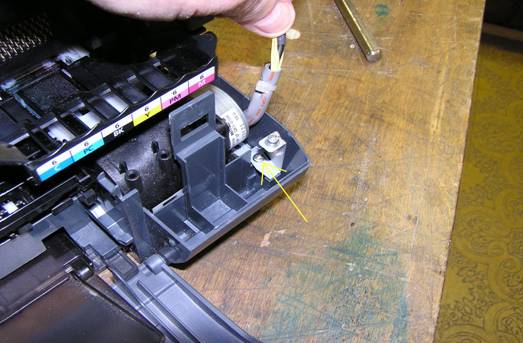
Figure 22
Later when removing clip from base, note screw location.
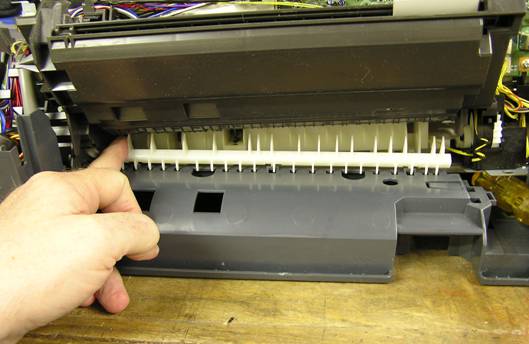
Figure 23
As you lift out printer carriage assembly from the base, the paper guiding fingerswant to fall out. Note the direction of the fingers and how they are clippedon to the base, so you can reinstall them properly.
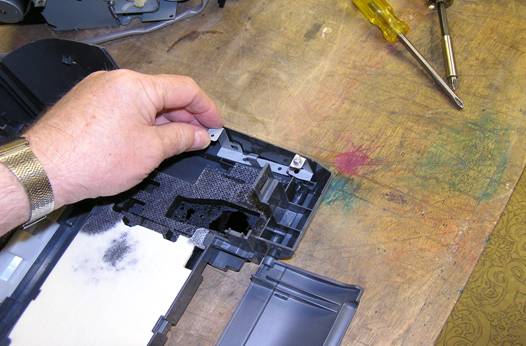
Figure 24
Remove mounting clip from base by removing screw shown earlier andput in a safe place.
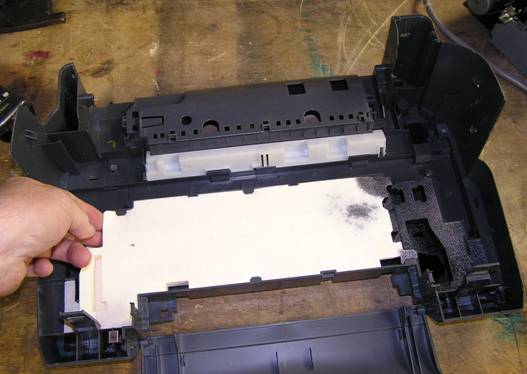
Figure 25
We have now arrived at the waste ink (tank) absorbent pads.Notice the pads directly below the print head parked position are the most saturated.
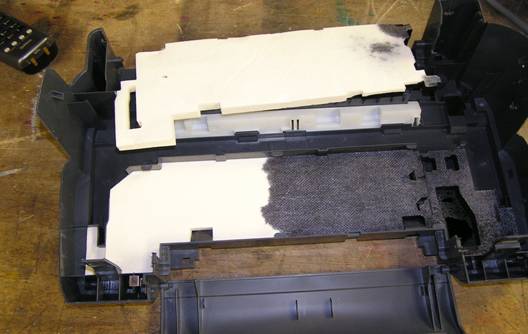
Figure 26
With the top pad removed you can see the amount of ink the lower pad has accumulated.
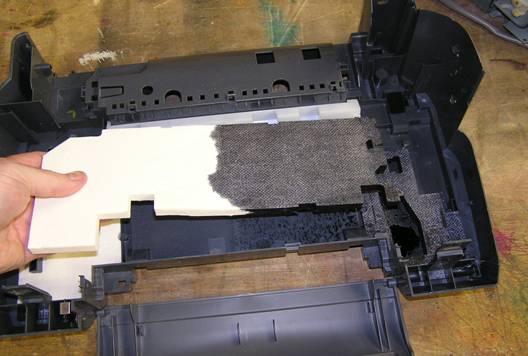
Figure 27
Remove the pads for replacement or cleaning.
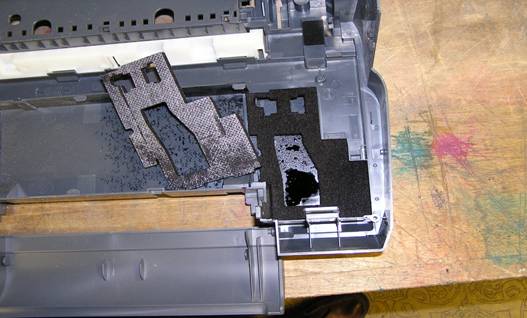
Figure 28
There are two pads below where the print head parks.Notice the different texture on one side of the pads.The cloth-like side of the pads goes down on the bottom pad,and up on the top pad.

Figure 29
Again, remove the pads for replacement or cleaning.Seeing as this printer has been discontinued by Canon, cleaning is probably youronly option. When cleaning the pads, it becomes necessary to squeeze out the water at some point.This squeezing causes the pads to compress to about half their thickness. So when you reinstall them they do not fill to the same height as before. I have found this not to be a problem. As they fill up with ink again, they expand as they suck up the ink, albeit not completely to their pre-washed thickness.It has been suggested not to squeeze out the pads, but to just let them drip dry fora few days. Although I have not tried this yet, it might be the better option.
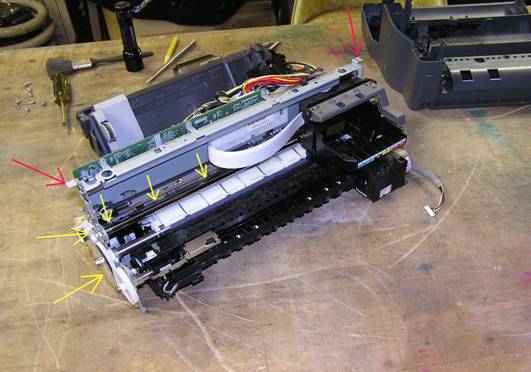
Figure 30
Important !!! A note of caution here !!!When handling the printer carriage, be very careful of the Mylar location disc on the left of the carriage and the Mylar location strip (Yellow Arrows) running along the back of the print head carriage.Please DO NOT DAMAGE THESE. When lifting printer carriage out of base, use the tabs (Red Arrows) to do the lifting. As Usual reassemble in reverse order.
This is very professionally done!
After years of using my i960 printer to print thousands of 4×6 color prints and probably a thousand or more letter size copies, I finally got the dreaded waste tank full error. I found this site (excellent instructions) & started to disassemble the printer. Reviewing the tear-down instructions, I believed that this was going to be a time-consuming process.
Had an idea of a quick alternate process. I raised the lid to make the print head move to the center, then pulled the power plug. This allows the print head to move freely to either side.
Then I got a roll of paper towels, a 3″ putty knife & a large straight screw driver. I doubled over a piece of paper towel, placed it over the open slot where the ink pad is. Then using the putty knife I pushed the towel into the pad. This absorbed the ink. Since there was less room to work, I used the screw driver at the ends of the slot. I used numerous pieces of towel & after about 20 minutes, the towel didn’t show much ink absorption. So far, I’m not getting the error message & the printer prints OK. This solution probably won’t last as long as the complete cleaning, but it’s sure much easier to do. Plus there’s no risk in doing damage to the printer.
I pulled the pads out and wash them with hot water in the sink until water was clear. after pressing out most of the water with paper towels, I put them in the oven at 170 degree for about an hour and half. Reinstalled and put the printer back together. I had to try the reset a few times but it is now working very well. Test print came out good.
Excellent guide! I successfully completed the cleaning process, but have not been able to clear the code. After several reset attempts, I still get the “The waste ink absorber is almost full” error message and the amber light flashing eight time followed by one green flash. We love this printer (and have ~160 bucks worth of ink cartridges). Any advice on resetting that code?
I want to thank you for posting this instructions, it encouraged me to fix the waste ink absorber problem. Everything went fine with the disassembly, I removed the pads, washed them in warm water with a small mixture of alcohol and ammonia, rinse several times and let it dry without squeezing for a couple days. I installed the pads, put the printer together, reset the counter successfully on 3 trials (my mistake) and now the printer is working fine and like new again. I must say that there was an small spring left over that I could not find where it came from, but the printer is working fine. Thank you for the graphics and for for sharing this valuable information; the I960 is a great printer, I been very happy with it and it was worth the trouble to save it. I have no tips to share since the instructions are very clear and if you take your time and study the photos, follow your common sense, you will have no problems. Good luck.
I did it! I completely disassembled it & cleaned the pads, reset the counter and it all works. However, it is a very irritating job. The pictures were very helpful (thank you!), but should have including some warnings.
1. Be careful of the switch assembly that presses the little button on the top of the circuit board that lets the printer know whether the cover is up or down. When snapping on the case it is very easy to misalign this so it doesn’t work and if you do, the symptoms are bewildering.
2. The lever that rests on the bottom right of the paper, along with a complicated lifter, can fall off their axles. Putting them back is tricky, and if done wrong will prevent the printer from feeding paper. Observe the arrangement immediately after removing the top and check it before snapping on the case again.
Is there no where one could purchase new pads? Cleaning them is a messy operation.
Recently, I started to get printed out documents with a rose or pinkish color. To correct this I went to properties and selected grayscale printing. Then the documents came out as a normal white page document with black print.
Question is? What is causing the rose/pinkish printouts, wastetank problems? etc.
Thank you.
Jerry
Many thanks for the photo layout. Other instructions I have seen suggest that the dismantling of the printer is largely a matter of common sense. Would that it were so. I would have been lost had it not been for this detailed overview.
I just want to express my thanks for all the time and outstanding effort put in your article 1960 waste tank pad replacement!
Your time spent with photographing each step worked perfectly for guiding process step by step!
Thank You!!!!!
James Maguire
I have an i960 that has worked very well for a number of years. Recently, my wife caused an horrific paper jam printing a multi-page doc with the print tray closed. I then made a bad problem worse when trying to clear the jam – I broke, what i believe is the timing strip film. “It’s a long thin strip of film-like material that runs parallel to the printhead track.”
Two questions:
1. Is it still possible to get a replacement part?
2. Is it relatively easy to install the new strip?
Any intel/suggestions would be much appreciated.
Thanks.
David
David, send me an email to caltx (at) flash.net
Tom
Thank you so much for the detailed photos and instructions. I was able to follow through and at times it felt a bit of a daunting challenge but in the end it all worked out well! Just needed to take my time and label all the screws and where they came out of. I used the oven method (170 degrees) as posted in the comments section because I didn’t have a couple days to let the pads dry. Thanks again!
This took a lot longer than I thought it would (maybe 3 hours of tinkering), but it worked! Here are a couple of tips:
The locking fingers on the spreader bar were tough for me. After I finally pried it off, breaking some of the tiny tabs, I realized that there is a small circle on the inside of each leg (under the bar itself). If you push this outward with a pen, the bar will pop right off on that side.
My paper guiding fingers didn’t fall out (I don’t think), but the alignment of the paper is kind of off now – it’s like the top has a 0″ margin, and it’s slightly different for each page. I’m just putting up with it, but make sure you keep an eye on these and make sure they’re seated properly.
The cord that goes to the power/feed button console tends to sneak under the printing carriage, blocking it from settling squarely on the bottom. Keep an eye out for this and make sure it’s fed around the outside of the bottom of the carriage.
When you’re done, you need to reset the waste ink counter. Most of the instructions I saw online were incorrect, and it took me about 8 tries before I got it to work:
Start with the printer OFF
Hold down RESUME and then hold down POWER
release RESUME
press RESUME twice, then release POWER
Let green light blink until printer is done moving print head.
Press RESUME 4 times (not 3). The light will blink orange, green, orange, green. Press POWER.
The counter should now be reset and you won’t get the “Ink Pad Full” message anymore.
The instructions worked great. You need to put the power button cable back into position before you put the printer assembly back into the case. Or, you can undo the right side screw and stretch the case like I did to get it back into position. I used the oven at 175 F for two hours and finished off drying the cleaned pads with a microwave. They shrink but you can still get them back in. Resetting the waste ink counter is a PAIN! In addition to what Michael said above me I also removed the printer head, took out the paper and went through the reset cycyle 8 times. Then I reloaded the printer head and ink cartirges and paper, shut the printer off and then turned it back on. It finally worked.
Many thanks for this. Four years ago I cleaned the ink pads and put it back together okay, but couldn’t reset the printer. It’s only when I dragged it back out and tried Michael’s tip – which say to press RESUME 4 times – and Steve’s tip about removing the print head, that did the trick. Also, another site said to do the last two steps twice (see link), which I did as well, just to be sure, and it finally worked.
http://www.justanswer.com/printers/4tzvo-canon-i960-printer-shows-error-message-waste-ink-almost.html
If you want to get straight to how I fixed mine, skip to the second paragraph.
OMGoodness! I have had my i960 forever, printing thousands of documents and pictures. Then a few months back, I started getting the “waste ink tank almost full” error message. I found this VERY HELPFUL page when googling how to proceed. I admit, I continued to print despite the warning every time, because I just couldn’t find the time to dedicate to it. And I only printed when absolutely necessary. Then two days ago it completely stopped and said that the “tank is full” and to take it to maintenance. Now it was time to take action. Using this page and reading everyone’s comments, I took a stab at this myself despite my husband’s urging not to bother and we’ll buy a new printer this weekend. Guess what…his plans have changed 😀
I did not take anything apart. I used a flashlight, chopstick, paper towels and tweezers. That’s IT!
First, I had to reset the waste ink counter (steps given by Michael above):
Start with the printer OFF
Hold down RESUME and then hold down POWER
release RESUME
press RESUME twice, then release POWER
Let green light blink until printer is done moving print head.
Press RESUME 4 times (not 3). The light will blink orange, green, orange, green. Press POWER.
I had to do this because when I opened the cover, the print head would not move to the center, giving me the ability to slide it back and forth when unplugged. Probably because I ran this printer to the point of TAKE ME TO MAINTENANCE NOW.
Once I got the print head to move to the center when the lid was open, I kept power on as I unplugged. Then the head slides freely. You will see the strip of foam running across the bottom under the print head. Use tweezers on one end and carefully pull up one half at a time. It seems to be anchored down in the middle, and you wouldn’t want to try to remove the whole foam pad at once because the head would be in the way and then you will be taking things apart. Anyway, raise the foam up and use the paper towels and squeeze the foam until you don’t get much ink. Then the square foam on the left side can be completely lifted out with tweezers. Squeeze this between paper towels until no more ink shows (or rinse and dry VERY well). Notice how the square pad came out so that you can put it back in correctly. It is oddly shaped. There is not a foam pad on the right side, but instead a square platform that moves up and down when pushed, but make sure you use a paper towel again because this is COVERED in ink, and my finger tips prove it!
Where does the chopstick come in handy (you’re paying attention)? I used it with the paper towels to get into those hard to reach spots, and to blot the center of the foam pad that I never lifted out.
Once I felt I had absorbed as much ink as possible, I plugged it all back in and printed a note out for my hubby to find when he gets home tonight… “Gues what I fixed??!! :-D”
Thank you all for your wonderfully detailed posts!! It helped this mama out 😀
Being the kind of person who is notorious for taking things apart and NEVER being able to put them back together, I was starting to panic at all the steps at cleaning the waste ink absorber. I do like to read…so I read all the reviews. When I got to the last one, I saw a light at the end of a very dark tunnel. Ahhh..I can do this! Chopsticks out, tweezers, paper towels, flashlight, rubber gloves and a hair dryer! Half way through the tear down I realized my glasses should have been on that list. I only changed the 3 pads visible without taking anything apart. My middle strip came out fine with a little bit of delicate manoeuvrings. The two small ones to the left and right came out with the tweezers. Ran them under the tap, rinsed until the water ran clear. Blotted them as dry as I could, then used the hair dryer to finish them off. Back in and only had to press resume once. I presume there are bigger pads underneath I may have to change one day, according to the slide show. But for now printer is back on line! 😉
I’ve tried to remove the flashing orange and succeeded, but the printhead is not moving to the center position. Can you help?
Rob,
Thank you for taking the time to post the i960 ink absorbing pad replacement or in my case cleaning.
Everything when smoothly. However my print head is dead (5 amber flashes). But got a refurbished one coming which is worth a try. 8 amber flashes is ink pad counter high.
Larry, I wish I had an answer for you. I’d suggest checking out / posting on my printer forum in the Canon section here: https://www.printerknowledge.com/forums/canon-inkjet-printers.8/