We’ve had a lot of interest in the Automatic Compost Sifter – Screen post. One visitor of the site, Richard Buxton, posted a comment and sent a picture. I was so impressed I asked him to submit some more details so I could post it up as its own article. So, below we present the “Son of Sid”:
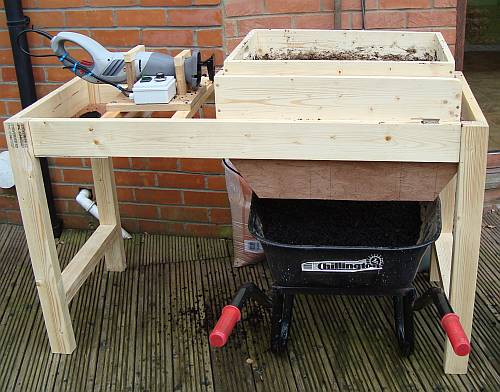
A sieve-box moves backwards and forwards by means of an electric motor. Sifted material falls through a mesh base and a guide chute into a wheelbarrow below. The sieve-box is hinged to allow debris to be tipped out.
Two open boxes; similar to kitchen drawers but without bases, are nested inside one another and arranged so that the inner box may be tipped up on a piano hinge for clearing any material that does not fall through the mesh.
The two nested boxes have four small, in-line castors underneath to allow lateral movement along two rails. These full-length rails are supported on six anti-vibration mounts (Elasto Mount – AT type) that attach through angle brackets to the inside faces of the long-rails of a supporting table-frame.
Movement is provided by a reciprocating saw clamped to a board and firmly anchored across the running rails. The Saw mechanism is connected by means of a push-pull bar fixed to the outer of the two nested boxes with a gate latch and 10mm bolt.
The reciprocating saw has been modified to disable the original power switch and the simple speed control electronics have been removed and adapted to provide a slower rate of reciprocation. A watertight enclosure fixed to the saw mounting board contains the removed speed controller circuit together with an illuminated on/off switch and a speed adjustment knob as operator controls.
The running rails are joined together by cross batons in the manner of railway sleepers so that all moving components and all anti-vibration mounts act in unison. As the reciprocating mechanism moves so does the sieve-box assembly.
The fitted mesh is ½ inch square but a finer mesh of ¼ inch may be dropped in on a sub frame for a finer particle size.
- Overall dimensions of table-frame: Length1340 – Width 560 – Height 950
- Sieve box: Length 610 – Width 455 – Depth 120
- Original speed 300 – 3000 cycles/min. Modified speed 0 – 200 cycles/min.
- Power consumption estimated to be in the order of 100W
|
In motion for the first time |
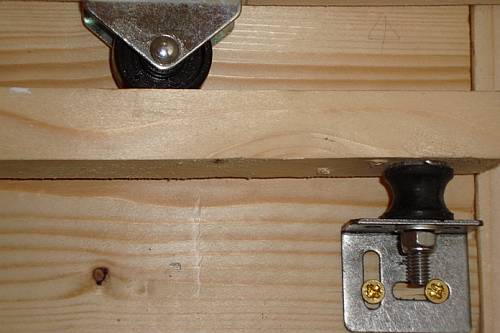
Rail with castor & A / V mount |
 This view shows the sifting box tipped up.
You can also see a rudimentary mudguard covering the castor wheel but some
sifted compost is visible on the running rail so I think I will need to fit full length
mudguards instead of these boy-racer ones.
Son of Sid has a very smooth action
The speed controller is subject to variation due to ambient temperature but luckily the purely
accidental selection of components I used (potentiometer and two resistors) allows me to adjust the speed accordingly.
If I load it too heavily I need to turn the wick up a little to get him running properly and as he empties I can turn it down.
The concept idea came from Sid the Sifter and my motivation was nothing more than laziness.
People often say, “Here’s something I made form bits I had lying around.”
True I did use a few lying around bits but I bought most of it – the most sexpensive of course being the saw
which cost £36 ($52)
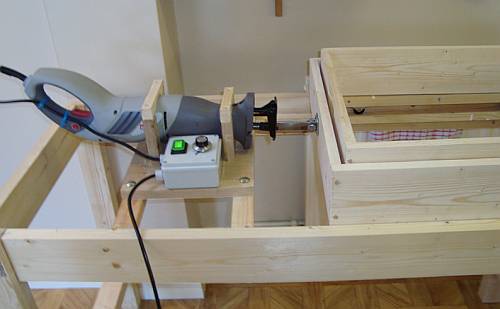
| This picture shows motor, control box and combined tool store and cup holder. (I am NOT responsible for the brickwork in the background). |
 |
| Three quarter view. Notice tipping hinge and strain relief bracket on table frame – slotted into carrier box to reduce tipping strain |
 |
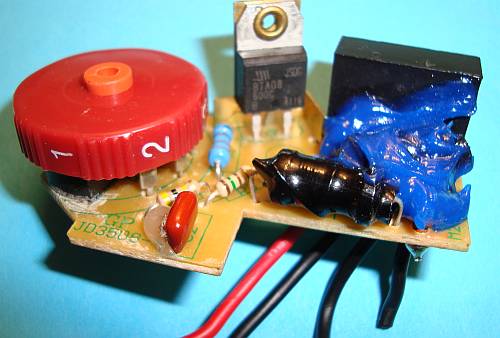
| The Design | 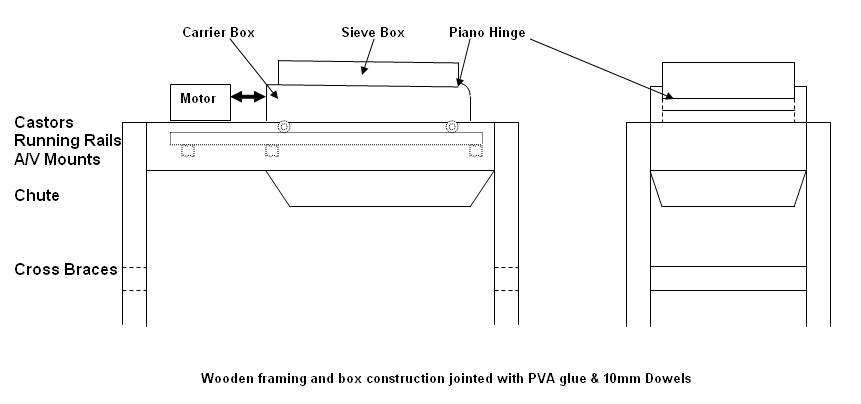 |
| Speed controller: The Red Wheel is a combined switch and speed potentiometer – on the full speed setting the switch bypasses the speed control. I removed this control completely – five soldered connections |
 |
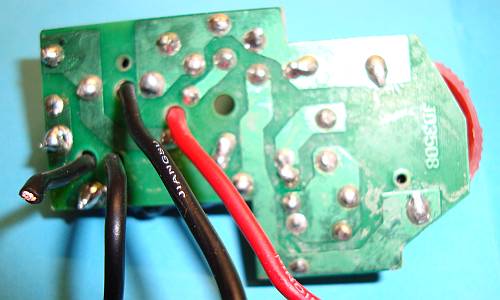
| Speed controller reverse: You can easily see the five joints all in a circle that hold the potientiometer on the circuit board. The new control potentiometer connects to the two pads on the left. I used a 120K linear pot and added ballast resistors by trial and error to get the speed range I wanted. I think the total resistance was close to 850k – up from 500k on the original |
 |
A huge thanks to Richard for all the great pictures and information!
Superb job, I wish I had your electrical know-how on the control unit, I have to be quick off the mark to pull the plug out of the extension lead when things get a little hairy with Sid! (www.youtube.com/user/Thomoco)
If you and the boy are ever passing through Norfolk maybe we could have a Sid-Off!
Get some moving images up on YouTube asap.
Cheers.
Thanks for the compliment – praise from the master sifter is much appreciated…
The electrical changes were quite easy – I reasoned that the big transistor was switching power on and off to the motor and that the thumb wheel set the on/off periods to vary the speed. I took out the original wheel, measured its resistance and replaced it with even more resistance for a slower speed range. All trial and error at a cost of about £3.
As for the moving images – I’l try – as for the Sid-Off there’s no contest – I wouldn’t stand a chance…
how has the saw held up i used a mikita and it broke
Jerry – have you built a sifter? Is there a picture? Tell us more…
I feel so guilty – Makita tools are good quality and about three times the price of my cheap one. How did it break mechanical or electrical? If my design has cost you money I am very sorry.
My saw has been OK – typical duty cycle from 5 to 20 minutes – I keep the speed quite low to minimise vibration but fast enough to sift reasonably quickly. At the moment most of my sifting has been with wet material – compost from last year’s pots with matted roots – big lumps, up to the size of a basketball – and about five or six outings. I now look for opportunities to do sifting.
The full-load power rating of my saw is 850W but that’s at 3000 strokes per min. I run at about 100 to 200 cycles and can only guess at the power consumption: 100 to 200W according to the speed setting maybe. A heavy load will cause the saw to almost stop so I adjust the speed control to get it moving properly and turn it down by degrees as the sifting progresses. I had concerns about the push pull bar but it’s held up ok – 2mm hardened steel.
I suspect the weak point on Son of Sid may probably be the lower wood screw fixings of the motor mounting blocks (oak) but no wobbling there yet thankfully. I think the AV mounts have removed a lot of stress from the system – originally I used just 4 of them but increased this to 6 to overcome rail vibration during early testing.
the excentric wheel striped had to go pick up parts and repair, i will not use it fo anything but sawing from now on.
richard – no i have not built a sifter yetprobably not till i can ask my son to do it for me
Richard, take a look at Sid’s latest video http://www.youtube.com/watch?v=1h0v6aBd8VI&feature=channel_page I had to bring him out of retirement for one last job, 13 tons over 2 days! Took it in his stride!! Keep on Sidding!!!
Mr T – Sid was excellent in his first incarnation and now appears to be beyond compare. Word has it that your rammed earth outbuilding can be seen from the moon! The offspring by comparison is merely a toddler. More power to your adobe.
Hi Richard, I like your design quite a bit. I have a similar setup, forgetting the main objective was to remove the pebbles from my back yard so I can put in a lawn, I spent 8+ hours (Professionally, I’m a programmer but I’m a self learning handy man; “bob the builder” level). Anyhow, can you elaborate on how you mounted your replicating saw to your outer frame? If possible, a close up picture would be appreciated; I’m having a devil of a time finding an “off the shelf” bolt / screw / etc to attach to my frame. I wanted to attach the Saw to a rather large “seat†spring and then to the box to get things shaking, but I’ll be happy with a solid connection. Thanks again for the great model. – T
I used oak that I had lying around for most of the mountings and the baseboard and the top clamps just happen to be common softwood scraps.
I used a profile gauge to take a copy of the saw body and cut two cradles which I screwed to the rectangular base board from underneath. The two profiled clamps just screw down onto the top of the cradles.
I fixed (screwed) two softwood cross pieces to the running rails and fixed the mounting board to these cross rails with four 10mm coach bolts. Some of the detail can be seen by clicking on the top picture in the table showing Motor & control box.
I deliberately made the running rails full-length to allow the motor and its base to be on the same A/V mounts as the sieve box. Originally I just used four A/V mounts but the vibration was not properly damped so I added two more in the places shown in the outline drawing.
All moving parts including the motor mounting are supported on the AV mounts which I got from here… http://www.rino.co.uk/products.asp?subcatid=187
AT-ZY-6-25-20
Spring suspension may be a good idea but I would think it may need some form of damping – that’s why I went for the rubber A/V mounts but…
When I use my machine I find that the “action” only takes place when the box actually changes direction – which is a bit obvious. The acceleration from a standstill each time is a bit of a drawback and if I load it too heavily the acceleration is not good enough to shake the contents sufficiently – I have to turn the wick up to help it.
The fixing between the saw and the sieve box is solid. An old piece of chrome steel was cut to fit the saw and drilled 10mm at the other end and bolted to a gate-latch eye-bracket with a Nylock Nut. The gate latch is fixed to the outer box with 4mm nylocked machine screws. A spring in this linkage just wouldn’t work – nothing would move except the spring!
Let us know how your machine develops – send pictures. Good luck
Construction and use update…
My sifter has had a lot of use over the summer and early autumn and is starting to show signs of stress…
Where the piano hinge fixes to the chamfered box-end, the fixing screws have caused a split to develop across the top of the chamfer in the screw line – I will need to fit a new piano hinge with screw holes further away from the pivot line.
Constant operation has weakened the frame-end attachment to the side rails and an end frame began to separate in the glue line. A heafty bash with a mallet and small metal brackets have brought it under control.
All other components seem to be holding together very well and a duty cyle in excess of 30 minutes continuous running is not unusual. Wet material tends to stick in the sieve box and sometimes needs help to fall through. This is slightly annoying but still far easier then hand sifting. I managed nearly a cubic yard of sifting mostly wet compost in about two hours and did not break into a sweat.
Have just finished a programme of heavy sifting – approximately 6 or 7 cubic metres of material producing a full cubic metre of stones and twig debris etc.
The sifter remains in one piece – just – and will need a heavy refurb over the winter – end joints coming apart and the tipping hinge becoming loose.
The reciprocating motion is Not such a good idea – it places too much strain on the joints – from what I have seen on here a rotating drum approach is much kinder on the construction.
Until it dies completely, however, I shall carry on going back and forth.
In the mean time I have a disposal problem with a big bag of stones to get rid of.
The sifter continues to work – but the constant back and forth motion has rocked apart the end joints of the frame. I dismantled the whole thing and remade the ends using robust angle brackets for a more permanent joining.
Dirt and dust had got into the motor – more precisely the gearbox – and was gumming up the works. It was a relatively simple matter to dismantle, clean, lubricate and reassemble the moving parts.
The castors had worn groves in the running rails so these were inverted.
With it all back together again it was virtually as good as new. I have processed all last year’s pot and bag compost over a period of a couple of days and have a yard and a half of good stuff to use as a soil conditioner. I also mix it with new compost to make the new stuff go a bit further.
In operation I now stand the machine in a stout builders’ bag and use the bag to collect the sifted material – when the bag is close to full I just tip the sifter up and move it to the next bag. For smaller jobs I would use the wheelbarrow.