This is the third post in my 3D-printing series. The first article covered the story of how I got into 3D printing and how my printers evolved over time. The second article covered the bigger lessons. This one is the project archive: the actual prints, fixes, experiments, and favorite builds.
Most of these projects originally showed up as posts, follow-ups, or little experiments shared in the PrinterKnowledge community, which is part of why this article works well as the catalog companion to the first two.
Jump to: Gifts, Awards, and Display Pieces | Workshop and Organization | Car, Bike, and Gear Accessories | Printer Accessories and Mods | Fun Prints and Experiments | Household Fixes
Gifts, Awards, and Display Pieces
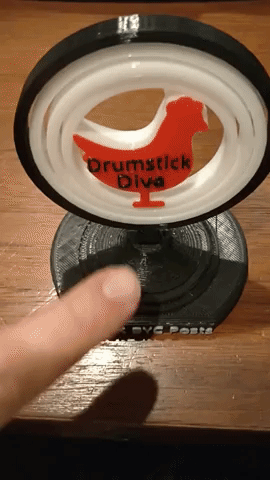
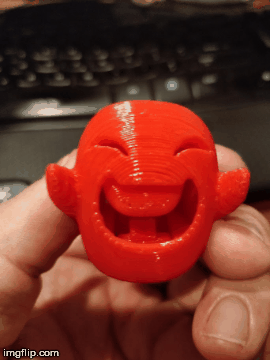
Chicken Trophy Award 30
Reason: A BackYardChickens member hit 100,000 posts, and I wanted something much more personal than a generic trophy.
Notes: I built the trophy from a mix of source models, a scanned chicken silhouette, custom text, and a lot of manual color swaps. The base was weighted first with copper BBs dropped into large infill cavities during the print, then later improved with a cleaner internal pocket for tire weights when I made additional versions.31 By the time I was printing the third major version, I was still refining orientation and weighting details.32
Workshop and Organization
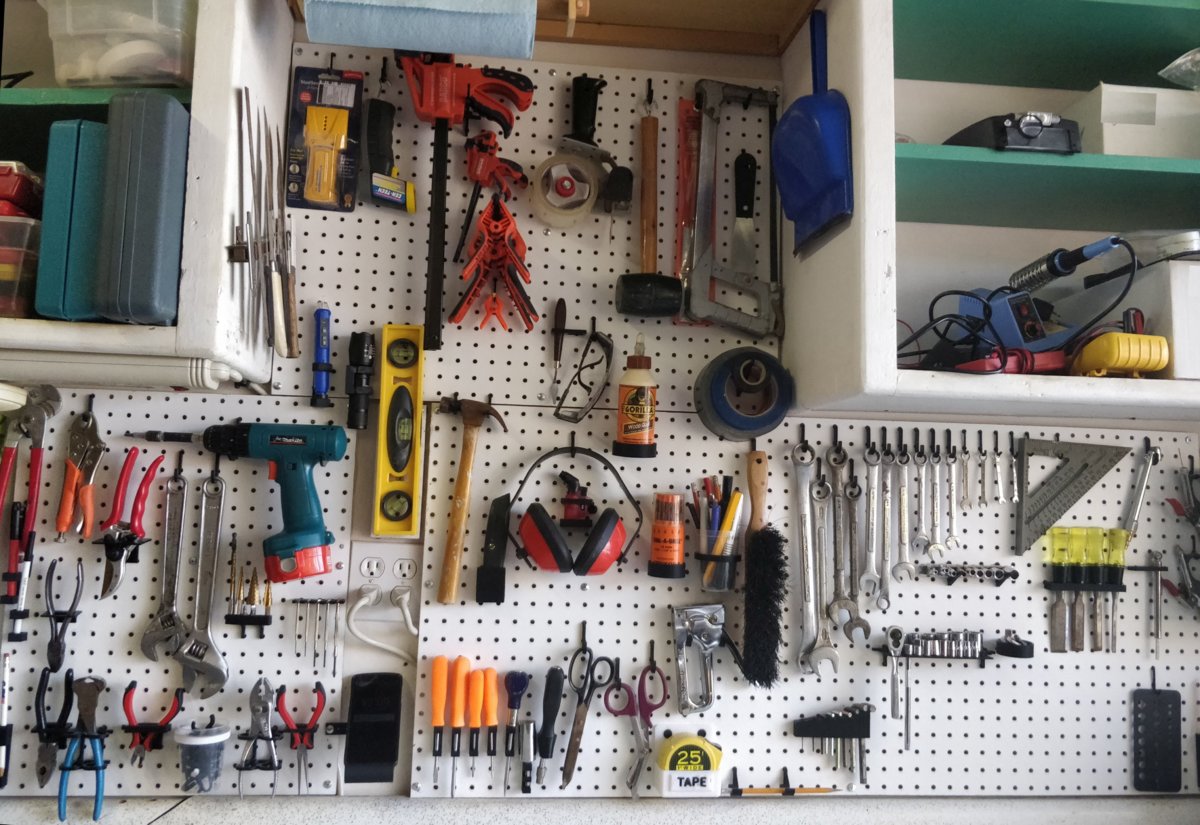
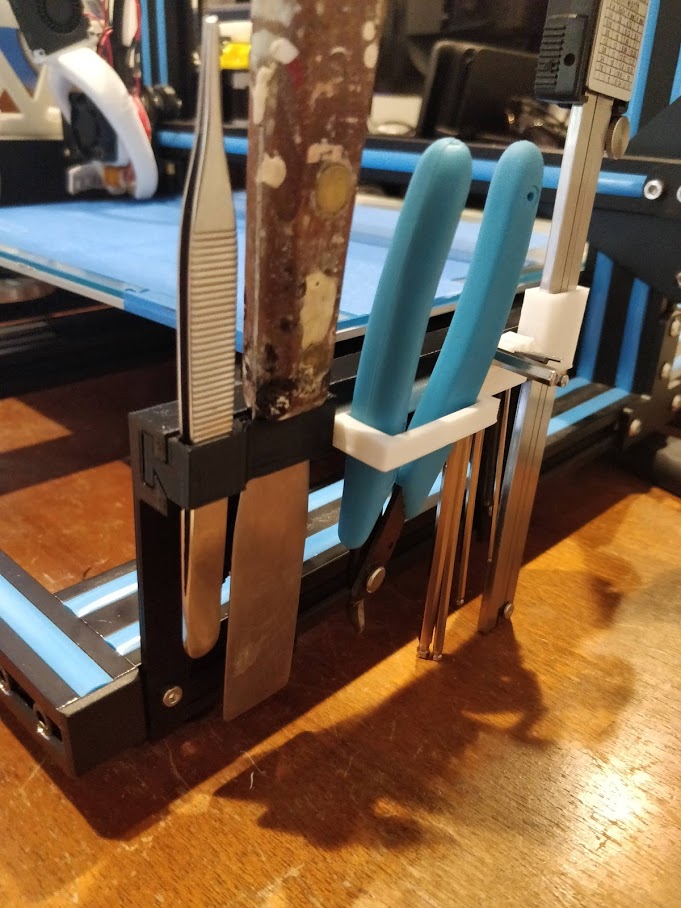
Pegboard Tool Wall 23
Reason: I wanted the wall above my workbench to fit my actual tools instead of settling for generic hooks and clutter.
Notes: I ended up spending days designing and printing holders for drills, sockets, Allen wrenches, a flashlight, a tape measure, and a bunch of small containers. It took far longer than buying off-the-shelf hardware, but the result fit everything perfectly and even helped me get rid of duplicate tools that had been sitting around for years.
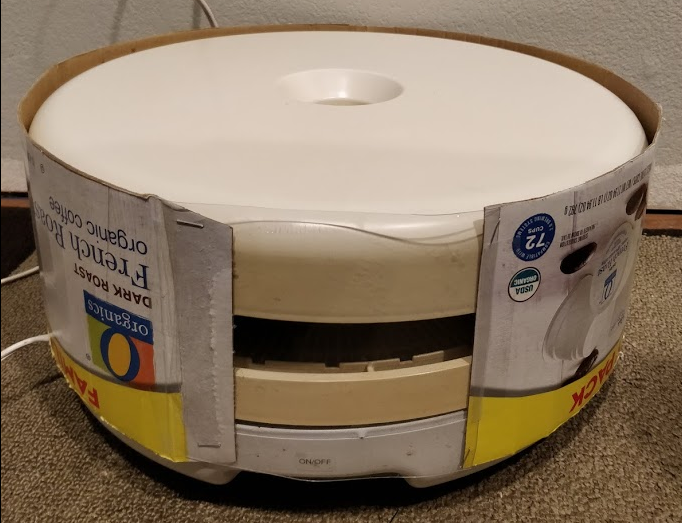
Early Filament Dryer Hack 20
Reason: I started noticing filament problems and wanted a quick way to dry a spool without buying a dedicated solution.
Notes: I turned a twenty-plus-year-old dehydrator, cardboard, and clear plastic into a temporary filament dryer. It was crude, but it worked well enough to prove that filament moisture deserved more attention than I had been giving it.
Temporary Bag-Style Dry Box 21
Reason: I wanted a stopgap dry storage solution while I figured out what a more permanent box should look like.
Notes: This was my total ghetto version: a zipper bag, a Bowden tube passing through printed ports, and a desiccant box inside. It was temporary, but it was also one of those classic 3D-printing setups where a quick ugly solution taught me exactly what the more permanent version needed.

Dual-Spool Dry Box 22
Reason: I needed a cleaner long-term way to store filament, feed it directly, and keep an eye on humidity.
Notes: This build combined an airtight box, bearings, spool hubs, a PTFE exit port, desiccant, and hygrometers. It worked well, but it also taught me that the whole feed path matters, not just the humidity number inside the box.

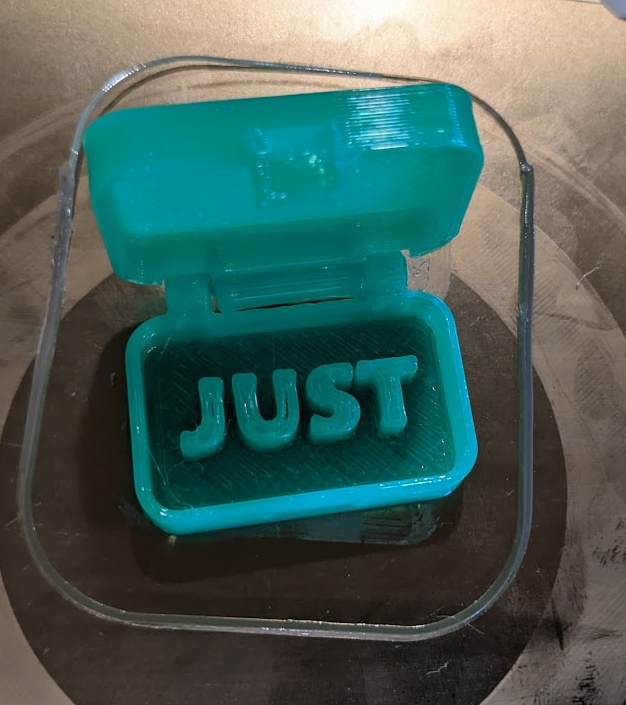
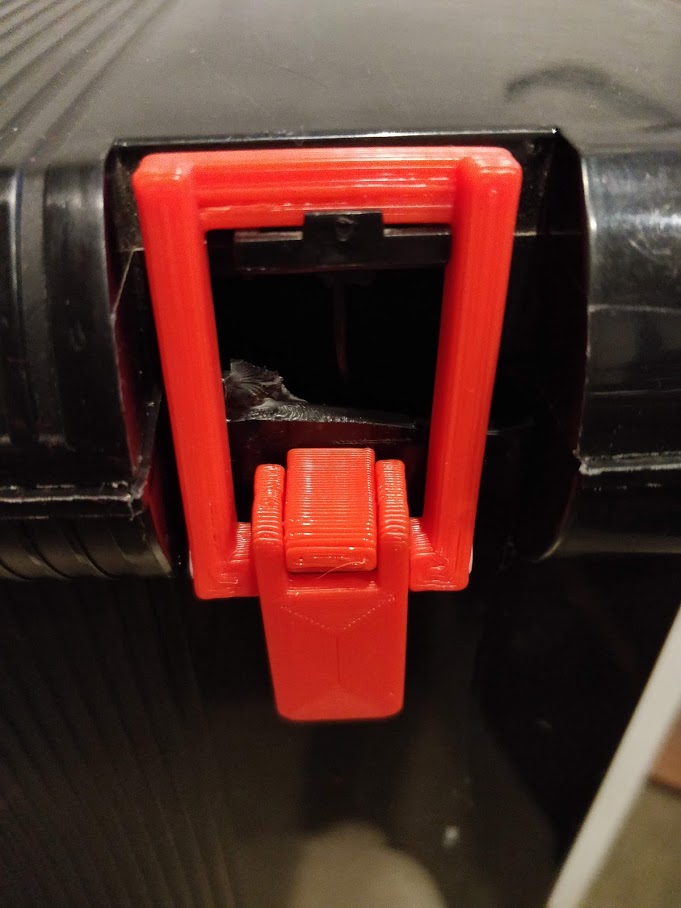
“Just in Case” Mini Case 24
Reason: I saw the design, liked the joke, and printed a quick slim version because it was too fun not to.
File: Printables file
Notes: This is the kind of small side print I would not build an article around, but it belongs in the project archive because it captures the lighter side of the hobby well.
Car, Bike, and Gear Accessories
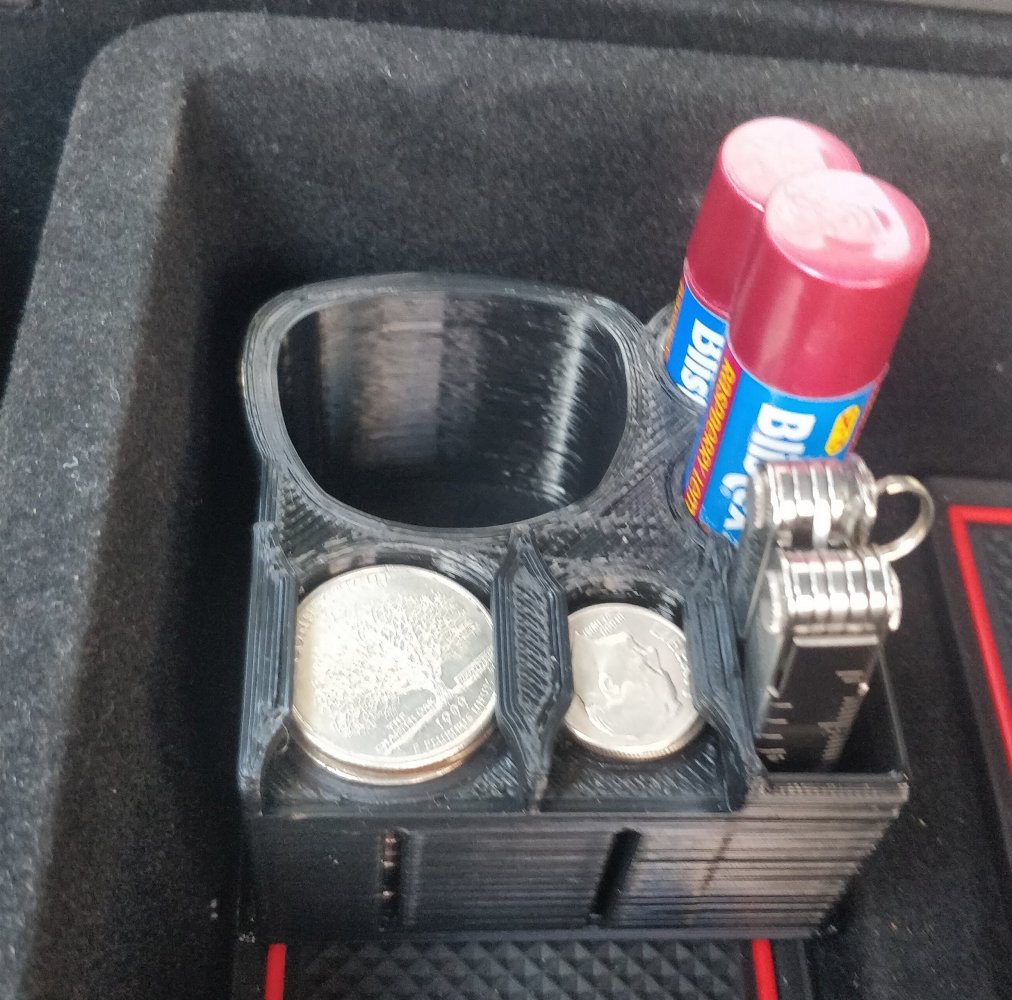
Mazda 6 Coin Dispenser Tray 25
Reason: My Mazda 6 had no good coin tray, and the first thing I tried was not robust or quiet enough.
File: Thingiverse project
Notes: I went through multiple designs before landing on a spring-loaded dispenser that actually felt right in the car. After the first version, I also adjusted the tray height, narrowed the body, and added a backstop so loading coins one-handed would be easier.26

Tesla Model 3 Console Tray / Charge Adapter Holder 27
Reason: I wanted one part that could hold the Tesla charge adapter, coins, ChapStick, and a small tool without rolling around in the console.
File: Thingiverse project
Notes: I got the charge-adapter profile by scanning it on a flatbed scanner, cleaning the shape up in Photoshop, importing it as an SVG into Tinkercad, and then building the whole tray around that geometry. This is one of the most me projects in the whole set.
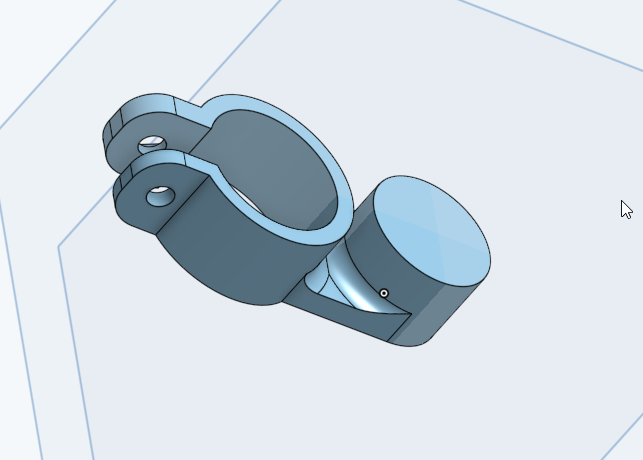
Bike Handlebar Adapter 28
Reason: New handlebars left me with thicker mounting areas and less room for the gear I wanted to attach.
Notes: I designed a clamp-style adapter in Onshape so I could bridge from the thicker section of the handlebar to the smaller accessory mount. The follow-up discussion also turned into a useful material question, because I was still deciding whether the finished version should stay in PLA, move to TPU, or end up in something more outdoor-friendly like PETG.29
Printer Accessories and Mods
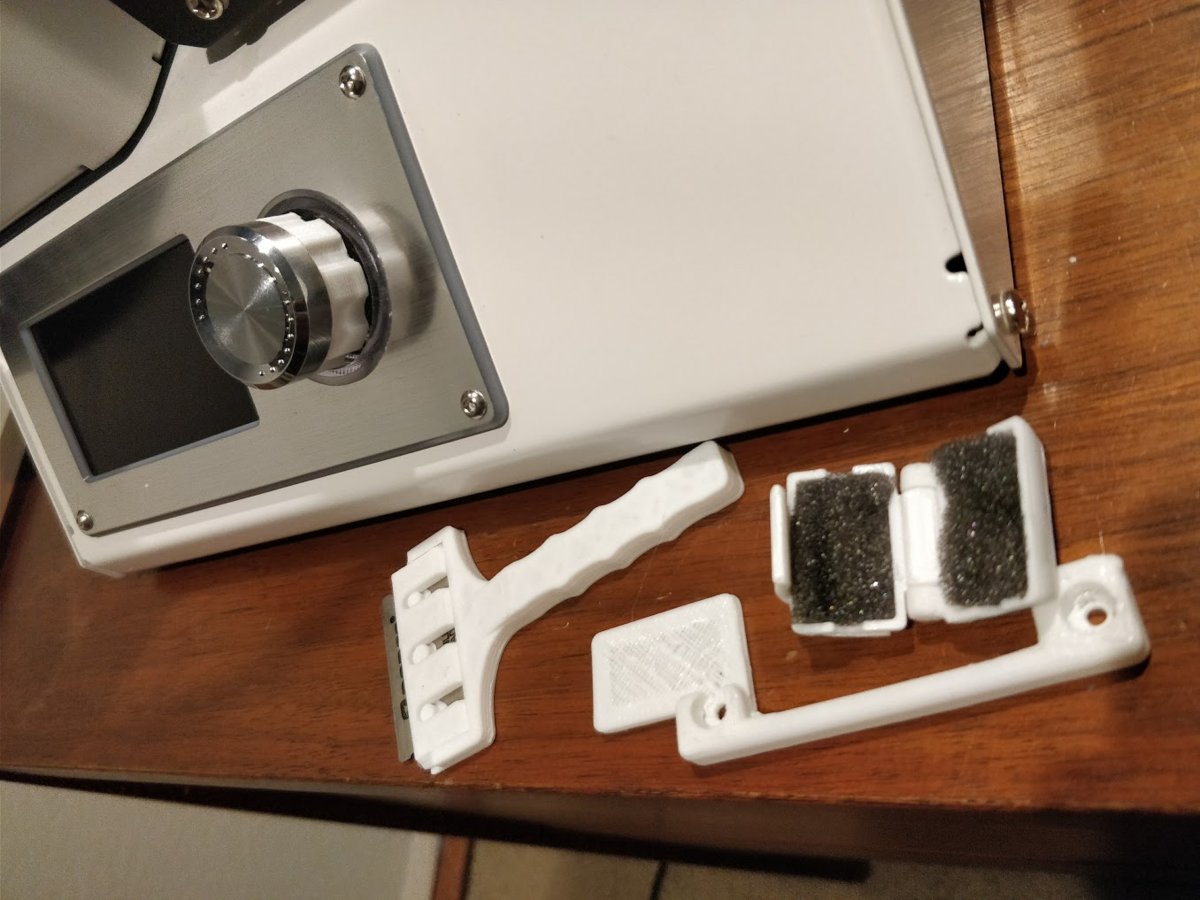
Early Monoprice Utility Prints 14
Reason: One of the first things I loved about 3D printing was using the machine to print things that made the machine itself better.
Files: Control dial extension, razor blade holder, filament dust filter, filter bar
Notes: This cluster of prints came almost immediately after my first useful print on the Monoprice and set the tone for a lot of what came later: practical, small, and weirdly satisfying because the printer was helping improve itself.15
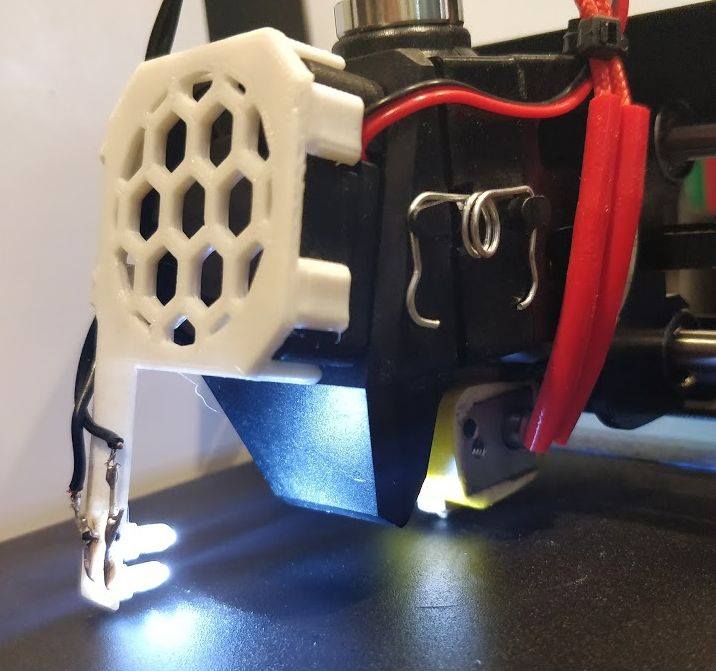
Monoprice Fan Cover & LED Light 16
Reason: I was tired of holding a flashlight to watch the first layer go down.
Source: Based on a remix of this snap-on fan cover
Notes: I added an arm that aimed toward the nozzle, angled holes for the LEDs, and wire clips along the side so the light would travel with the hotend and spotlight the exact area I cared about most.
CR-10 Modular Tool Holder 17
Reason: I wanted a tool holder that fit the CR-10 better than the original Monoprice setup and that I could keep customizing.
Source: Inspired by this modular holder
Notes: I extended and changed the original idea, moved it to a better position on the printer, and added custom holders that slid onto the rails. It was basically a tiny pegboard-on-rails system attached right to the machine.
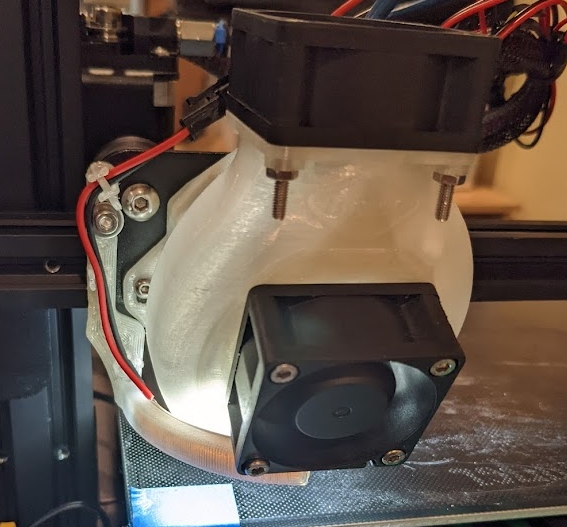
Ender 3 V2 LED Light Bar 18
Reason: I wanted better visibility around the nozzle without depending on overhead room lighting.
Source: Fang duct based on this duct
Notes: I printed a glow-in-the-dark fang duct, paired it with oversized fans I could undervolt, and then designed my own LED arm in Onshape so the light would stay close to the nozzle without getting in the way.
Big Nozzle Experiment 19
Reason: I am impatient by nature, so bigger nozzles were always tempting as a way to print faster.
File: Test model based on this design
Notes: I spent about a year being too nervous to change the nozzle, then jumped straight to a 1.0 mm nozzle just to see what would happen. The thick extrusion was hilarious, some layer heights were obviously too silly, and I ended up settling on a 0.6 mm nozzle as the most practical result of the experiment.

Fun Prints and Experiments
Cat Toy Set 33
Reason: I wanted some lightweight prints that would actually be fun for the cat rather than just fun for me to model.
Notes: This started with a downloaded ball toy that had a loose ball trapped inside, then quickly evolved into a wobble toy that I designed in Tinkercad with room for weights, string, and feathers. The progression from downloaded toy to scratch-built toy is a pretty good snapshot of how I tend to use 3D printing when a project starts getting more interesting.3435
My First Totally Useless Print 36
Reason: After a long streak of highly functional prints, I finally decided to print something that was absolutely useless just because it amused me.
File: Thingiverse model
Notes: Even this one was hard for me to leave completely alone. I scaled it down, added a magnet in the bottom to keep it weighted and in place, and of course appreciated that I already had the right filament colors sitting in the dry box.
Failproof Fidget Cube 37
Reason: I wanted a fun print that would actually get used instead of just sitting around looking clever.
File: Thingiverse model
Notes: We printed two of these on the CR-10 and my girls immediately claimed them. I even customized one in Tinkercad by embossing my daughter’s name and bunny ears into one side, which made it a good early example of how quickly I started personalizing other people’s models instead of printing them completely stock.
Ghost With Tongue 38
Reason: Sometimes I just wanted an easy, funny print that showed how satisfying a goofy little model could be.
File: Thingiverse model
Notes: I printed this one at 50 percent scale with a 0.6 mm nozzle and 0.3 mm layers, which made it a quick reminder that not every satisfying print has to be ambitious. It was just a super easy, low-effort print that came out better than it had any right to.
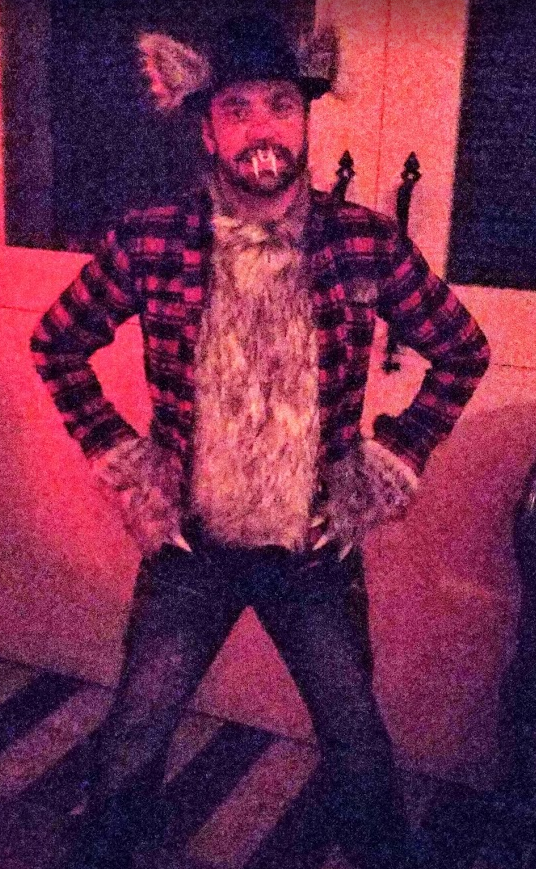
Wolf Costume: Claws, Fangs, and Ears 39
Reason: My date for a party wanted to be Red Riding Hood, which made wolf the only answer that felt worth doing.
Notes: I designed claws in Tinkercad, hollowed them so my fingertips would fit inside, printed wolf ears with magnets so they would mount cleanly to a hat, and even made printed fangs using moldable plastic impressions of my teeth as the base. It was one of the clearest examples of 3D printing letting me skip a generic store-bought costume and build something much more personal and specific instead.
Household Fixes
First Custom Toilet Seat Nut 1
Reason: I wanted my first real design to solve an actual problem instead of making random trinkets.
Notes: I built this in Tinkercad before the printer even arrived by importing an existing nut, building a polygon body around it, and then merging in a wingnut shape so I could tighten it by hand. A quick test print later showed the geometry idea was good, but the actual bolt size was wrong, which was a pretty good early introduction to calipers and iteration.2
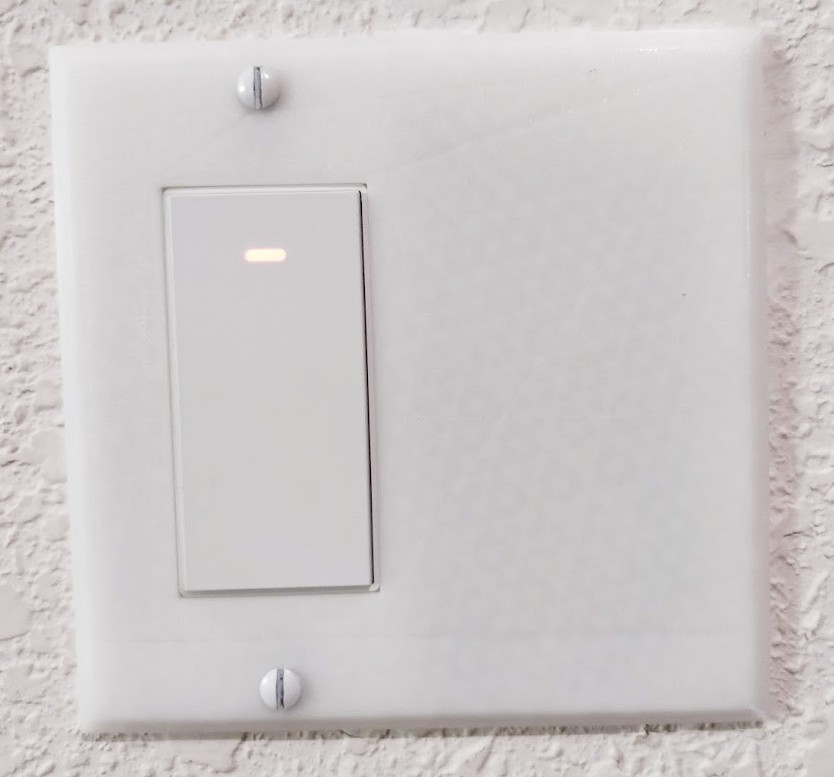
Custom 2-Gang Wall Plate 6
Reason: I was combining two switches into one smarter Wi-Fi-controlled setup and needed a specific wall plate that was not worth buying.
File: Thingiverse project
Notes: I customized a wall-plate model, printed it, then refined it with thicker walls and slower settings so the installed version would look better. The finished cover used only about 19 grams of filament, which worked out to roughly twenty-three cents in plastic cost at the time.7
Filebox Cam Lock Lever Latch 8
Reason: A decades-old folding file box had broken latches, which made the lid handle basically useless.
Notes: I remixed an existing latch design, built a better arm in Tinkercad for my specific box, and even used pieces of filament as pins before melting and flattening the ends to lock everything together. It ended up feeling much stronger and more satisfying than I expected, and at the time it felt like one of my most rewarding practical projects.9
Crest-to-Colgate Toothpaste Transfer Adapter 10
Reason: I wanted to refill a travel-size Crest tube using Colgate toothpaste and needed an adapter to marry the two thread types.
File: Thingiverse adapter
Notes: I printed and tested two existing adapters individually, then merged them in Tinkercad so they would work together. This is one of those delightfully specific prints that nobody would ever mass-market well enough to make it worth buying.

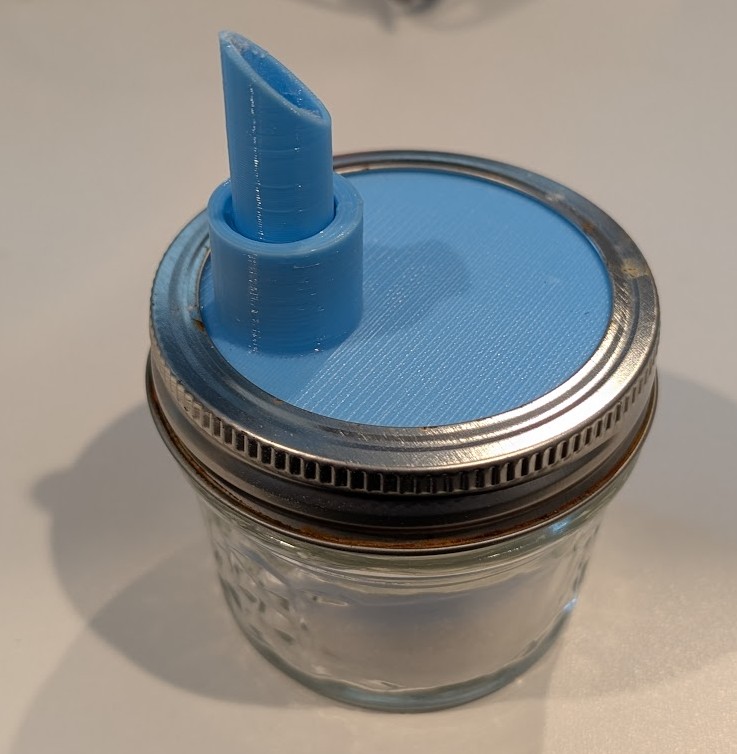
Sugar & Salt Measured Dispenser / Neti-Pot Lid 11
Reason: I wanted a clean measured-pour lid for dry ingredients and neti-pot solution mixing.
File: Printables remix
Notes: I rarely post remixes, so the fact that I posted this one says a lot. It is a good late-stage example of the kind of useful, small, specific print that still feels worth making years into the hobby.
SodaStream TPU Gasket 12
Reason: My girlfriend’s SodaStream was leaking badly and the original gasket had apparently vanished.
Notes: I measured the opening with calipers, modeled a replacement O-ring in Tinkercad, mocked it up in PLA first, and then printed the final version in TPU. It worked perfectly as a repair, which made it one of the most satisfying first-TPU prints I did. Later, after finding the original part, I could see that the TPU version had compressed and lost its bounceback over time, which turned it into a good lesson in long-term material behavior as well.13

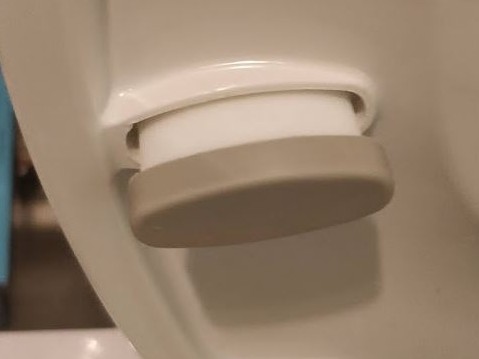
Toilet Seat / Bidet Spacer 3
Reason: Adding a bidet raised the seat and left a gap between the seat bumper and the bowl.
Notes: I scanned the original bumper, cleaned the shape up in Photoshop, imported it into Tinkercad, and iterated until I had a spacer that fit correctly while still keeping the feel of the original rubberized bumper. It was one of the most satisfying projects I did because it turned an annoying little household fitment problem into a clean custom fix. It was also fun seeing Chuck pin my comment on his video after I used his scan-to-Tinkercad approach.4 Later on I reprinted a stronger version with higher infill and more walls once one of the lightweight test versions broke.5
Between this catalog and the first two articles, the goal is that the bigger story, the bigger lessons, and most of the actual printed work all have a place to live without any one article having to do every job at once.
If you want the full story behind how I got into 3D printing and how my printers changed over time, go back to the first article. If you want the bigger takeaways on materials, CAD, workflow, and what the hobby actually taught me, that is in the second article.