
When my wife and I were thinking about getting chickens one of our concerns was how difficult it would be to care for them. I’ve got friends who completely “baby” their chickens (e.g. chicken diapers, baths, cleaning their watering dishes daily with bleach, etc.). I’ve also got friends who barely even deal with their chickens other than to make sure they’ve got some food and some water (no matter how dirty). I wanted to find a good balance between these two extremes, between fanatical and neglect.
One of the big “chicken care” questions was regarding food and water. I wanted to automate this process as much as possible.
WATER:
I looked into quite a few different solutions for getting water for my girls. One of those was to setup a nipple watering system. The pro’s of this system were:
1) They wasted less water.
2) They took up less floor space.
3) They didn’t fill up with dirt, feathers, leaves, shavings, etc.
The biggest cons of this system were going to be setting it up and training my girls how to use it. After buying a few of these nipples and testing them I decided I’d try something else.
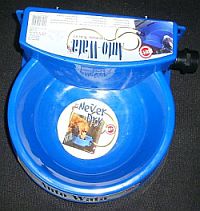
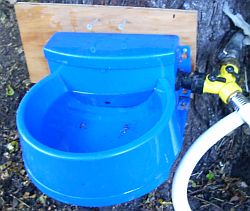
I saw some automatic poultry watering systems at the feed store but they were pretty expensive. I found something at Wal-Mart that works just as well and have been VERY happy with it. It is a “Never Dry Auto-Wata” system for dogs. It was only $12.78.
 FOOD:
FOOD:
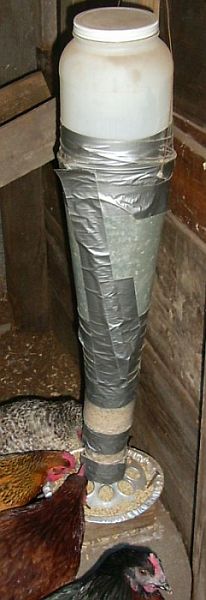
NOTE: This feeder (dubbed Frankenfeeder) is the perfect example of function over form. It worked great in all of it’s hideous glory! Below is an update with the new homemade chicken feeder I’m currently using (a bit better looking, more functional, larger capacity).
I saw a lot of different feeding systems and couldn’t decide what to do. I had a few extra mason jar feeders and thought I’d attempt a modification to one of them. If it didn’t work then I’d go out and buy something.
I took the mason jar feeding attachment and a small plastic peanut butter jar that was the same size as a mason jar. I cut the bottom off of the jar and attached a bigger peanut butter jar to the smaller one. I cut out the bottom of that one and took a long piece of A/C conduit and funneled the end a little to fit into the larger peanut butter jar. I then cut out the bottom of a big plastic container and attached it to the top of the conduit. Finally I cut some holes into the conduit and plastic container and threaded through some wire. This wire would support the majority of the weight of the feeder and take pressure off of the jars. I really like this feeder because it was cheap, takes up very little floor space, is easy to refill, holds a lot of feed, and oh yeah… it was cheap! I haven’t kept excellent track, but it seems that I only need to refill this feeder about 1-2 times a month. To the right is the finished product. It isn’t pretty, but is works GREAT!!!
Another idea I had was to add a tin pie plate nailed to a piece of wood that would catch the food as it is “billed out” by the girls. This keeps a substantial amount of food off the ground and from being wasted. The wood and the nails also help keep the feeder in place and from falling off of the cement block it is resting on. Below is a closer look
Additional Notes:
- My chickens spend most of their day free ranging in a large section of the back yard.
- The automated water system is outside of the coop / run.
-
I’ve got the feeder in the chicken run with a gallon waterer. I need to refill this waterer about every two weeks.
-
I feed my chickens old wheat from food storage and day old bread I get for free from the local supermarket. I also give them piles of worms and bugs from my compost bin. I haven’t noticed any decrease in egg size, frequency, or quality, but I have noticed a HUGE drop in the amount of feed I have to supply. This is wonderful since chicken feed in the city is about $14 for a 50 lb. bag.
-
I decided to do a test and didn’t give my girls any bread, wheat, worms and they weren’t let out of the run as much. They went through the whole feeder full of layer pellets in about a week!
UPDATE 9/15/07
I finally upgraded my “temporary” feeder so something a lot bigger and hopefully a bit nicer looking. You can read all the details here: HomeMade Chicken Feeder
UPDATE 12/2/09
My system has been working great for years. There were only two problems I’ve had:
- Waterer: The white supply hose going to the auto chicken waterer split open and gave our yard a good soak. I’m not sure if it was a weak spot because of a kink or if maybe a thirsty rat wanted a drink. A $2.75 hose mender and 10 minutes later everything was fine.
- Feeder: During a really bad storm some sideways rain got into my wood feeder… what a mess! I took the whole thing apart, scrubbed it out with bleach, let it dry really well and painted it all over an put it back together. Of course I also made sure that there would be no way water could get at the feeder again!
Please visit my site http://www.backyardchickens.com/ for a ton of great info on raising chickens.
Also, register with our 5,000 member community of chicken addicts: www.backyardchickens.com/forum/
To Mo Hillbilly
You must remember chickens eat and scratch things on the ground, people use pesticides on their grass, fertilizers, and weed killers, These items are toxic to chickens if eaten. Also the perfumed kitty litter is also toxic if eaten. Lime if highly deadly so becareful what you put under your roosts. Chickens do not do well with modern pesticides and etc. Keep them healthy go natural. The grass is a good idea if you know what has or has not been put on it.
Judi in Wyoming
Again I say, please listen to Judi.
I have to add expound on my agreement. Our chickens are free to come an go outside. The chicken hole was cut just large enough for them. Sometimes I wish it were larger. NOTE: their outside area is fenced against predators, otherwise we would have to close the door each night. That means there is not much to clean up inside.
Outside they eat the grass that grows, but we try to put grass clippings in there. They are our clippings and we don’t use any of that junk. The fact that we are eating the meat and eggs should be sufficient, but I am amazed at people who put toxic pesticides and herbicides on their vegetable gardens–Amazing.
I disagree with a lot of what environmentalists say, but one thing I agree with is that we must stop poisoning our food, water, and air. There are natural alternatives. If you are tempted to poison, write back and I will give you a natural solution.
Thank You Judi and Dallas. I didn’t realize lime was poisionous. We used it for pickles when canning.
The kitty litter can’t be reached by the chickens though. But as you have pointed out it is going to be put in the ground somewhere.
Dallas if you have a home remedy that is not poisionous I would surley like to use it. Any and all your remedies would be welcome. Thank You.
Am glad I put the ideas out here so they could be corrected and made better. I did and do not intend to poison or be mean to them and/or our enviroment.
Thank You Both,
Barbara
ps: I catch alot of flies with a can of sardines in maybe 4 plastic water bottles or such filled half full with water. One little 1/4 inch hole in the lid of the bottle. And the proverable fly strip of course.
Please do not get me wrong, I am NO tree hugger, but I do love animals and believe we should eat eggs that are natural, we also do not feed medicated food. I believe that the animals deserve the same treatment as we do when it comes to food and water.
Hope you have as much fun with your chickens as we do.
Judi in Wyoming
Mo. Hillbilly,
You asked for a home remedy, but what are you wanting to solve?
All,
By the way, speaking of kitty litter, we are experimenting with cracked corn. Cats seem to like it, and there are much less questions as to where to put it. We don’t need clay anywhere on our property, and no worries with the corn having anything added to it as it was intended as livestock feed.
In Reply to Dallas,
RuralnearDallas Says:
March 18th, 2009 at 3:15 am
Our chickens were in an enclosure in our barn until last month when a tornado blew it away:( They had a dirt floor which worked fine. Now we have them in a wooden building that used to be a playhouse. It is about 6′ x 8′. It has a wooden floor. We have about 12 birds in it.
Dallas, you should put your waterer on a longer chain and get rid of the pole, or raise the pole higher so the chickens cannot fly up to it. It really sounds a bit crowded in a 6×8 playhouse for 12 chickens with feed and water in there.
Also Dallas I am continuing to use kitty litter unscented) under my roosts. Clay is really not a bad thing. With the wire grid that is under the roost there is no problem with the chickens getting to any of the kitty litter anyway.
Lime (also know as Dololite) is a wonderful thing to use under the roost. Lime is not poisionus.
Corn will rot and smell really awful if you are trying to use it for your Cat. Besides drawing unwanted rodents when you toss it out.
So, Dallas, do you have another HOME remedy?
TO the girl that wanted to know why her Water Turned Green. The Sun turns water green. Keep it in the shade or covered some kind of way. A Wishing Well sounds lovely.
Grannie
OK.
Our chicken house would be too small except that it has a door to a rather large chicken yard. They can come and go as they please.
The pole was when the chickens were in the now gone barn. Our current system works well.
There is nothing wrong with clay except that we have too much on our property. We don’t have any problems with the corn.
I wouldn’t have any problem using lime except I don’t know why I would. I guess it is for order control, but we don’t seem to have a problem with that.
looking to make water and feed containers, does anyone have ideas..leaving for a 5 day vacation this summer and trying to be perpared..for our chickens..thanks for any help.
does anyone have any idea on how to make water and feeders for chickens, planning a summer vacation and trying to get prepared
Rhonda,
how many chickens do you have?
Trent & Jesslyns Idaho mini- farm.
Heres our opinion on using Lime in Chicken houses. We welcome anyones imput or comments.
We put our chickens into an old farm house on our 4(ish) acre farm. It has wooden floors in it. We put down straw bedding over the wood floors for the chickens. We have 2 Geese & 2 Ducks in with 45 hens of various breeds. The ducks-geese really enjoy their bath time and make quite a wet mess in the bedding around the waterer. We used the old style gravity feed waterer with the round tray attached to the bottom. After cleaning the bedding one time we found the wood to be thoroughly soaked on the waterer side of the room. Having a 10 year background in Tilesetting, I have lots of Lime (Calcium Oxide) kicking around, it can be found @ Home Depot next to the bagged cement. Also its not to be confused with “pickling lime” used in home canning. Lime is used as an additive to cement, stucco, deck mud, etc. It is also used in crawl spaces to absorb moisture in the soil and keep bugs and rodents away. It made sense to me to use it to dry out my wood floor. I know that it can be hard on ones skin (due to the fact that its an alkali) but had never heard that it was toxic to people or animals. While our Flock o’ Fowl were outside, I applied lime to the floor, with the windows open and a breathing mask on. I broomed a 2-3 lb pile around the room, leaving a faint coating over the wood. When the dust settled I gathered up the excess Lime, then put an extra heavy amount of bedding back down. This procedeure has helped keep the wood drier and cleaner and has never seemed to harm our beloved Flock. I found later that the addition of an old shower curtain under the waterer helped keep the floor even dryer. We put the waterer on cinderblocks to put the tray 6-8 inches off the floor. This also makes it harder to poop in. Adding a waterheater splash tray also helped contain splashing but it gets very filthy very quickly. Liming the room only happens about once a month, but it helps keep the floor from rotting away.
I would also like some input on my little “problem”
I live in an area that is still heavily agricultural. I spent a lot of time last fall gathering piles of spilled wheat and barley from the combine to truck loadling process. These grains are still whole and have lots of chaff, with small bits of dirt and small rocks. Due to the very time consuming process of separating the grain from the contaminants (it sounds easy but its anything but) we’ve elected to try and feed it whole (we cant grind the grain because of the small rocks). We’ve been boiling the grain on a stove or in the microwave. When done the grain has double or tripled in size and is soft enough to be smashed between ones fingers. To this “mash” we add minced fruit-veggies, suet, breads-crackers, and even chopped household leftovers (no red meat or chicken meat). Being an agricultural area also gives me access to an inexpensive supply of potatoes. I’ll wash the potatoes then put them through a shredder (hash brown size), I usually dont cook the “hash browns” but occasionally will boil them with the grain for something different. Our birds absolutely love the puffed grain and both versions of the potatoes. The only thing that I am not happy with is the way we have to feed our birds. Right now we are using 9X11(ish) cake pans. When feeding, our birds claw the feed out of the pans onto the floor, wasting, contaminating- defacating on, and scattering the mash. Traditional feeders wouldnt work with this wet feed as it wouldnt flow down to the feeder pan as needed. The feed sticks to the insides of the container. I’m lookin for a version of a feeder that would allow the birds ready access, but keep them from scattering food or pooping in the trays. I would appreciate any suggestions or ideas on this one please! Thank u.
Trent and Jesslyns Idaho mini-farm.
Rhonda,
Order a couple 360° Super Flow Nipples Item# WC1030 from Farmtek.com. They are $2.05 each.
I ordered about a dozen since they were so cheap.
Take two 5-gallon buckets. Make sure you have a lid that fits one of them.
Cut the bottom off of one bucket (the one without the lid).
Drill 2-3 holes in the bottom of the other bucket (the one with the lid) just a bit smaller than the diameter of the threaded ends of the nipples.
Place this second bucket inside the one with the missing bottom. I used caulk to glue the 2 buckets together. Doesn’t have to be strong since the caulk is only holding the outside bucket’s weight.
Thread nipples into the holes you drilled. Use some silicone sealant to ensure they don’t leak.
The outer bucket is there to protect the nipples when filling the bucket.
Hang the bucket using the inner bucket’s handle so that the bottom is at head height for the chickens. I used a couple short chain lengths hung from hooks in the run.
I have 14 hens and this is enough water for over 2 weeks in 90 degree summer heat.
I have make other waterers using smaller buckets placed around the yard for when they free-range.
I can send pictures if you like.
@ Trent—
Feeding wet mash is a time honored tradition. There is a particular version of feeder for doing it, though, to prevent exactly the problem you are having. It kind of looks like a wire version of a children’s merry-go-round that sits over or snaps onto the feed pan or is built into the side of a pen or coop, if that makes any sense. If built into the side, you can put the pan of wet mash to the birds easily, and turn if for them later so they can reach the second half of the ration if it’s too large for them to reach all the way across through the wires. I do have pictures if you would find that helpful.
I need to get a picture of the chicken feeder I built. Over the years I’ve grown weary of my girls scratching their feed out of the feeder and all over the ground, so I built a feeder using cheap PVC pipe. I took a piece of 6″ diameter PVC pipe, and cut it to 4 ft long. Then I bought a Y connection, and 2 end caps. The feeder goes end cap, long pipe section, y joint, short pipe section, end cap, and hangs vertically. Mine is strapped to the door of the coop so I can just open the door, take off the top cap, and fill it up. The pipe holds, I dunno, 8 to 10 pounds of feed. The hens can reach into the open end of the Y connector to eat, but can’t get their feet in it to make a mess. The feed will spill over into the open end of the Y until it hits the top of the inside opening, and then it stops.
Ok here’s a pic of someone else who built one like what I did, they use it for loose minerals for their goats. You can use any size pipe you can find, just mount it against a solid wall, low enough the girls can reach in, but high enough they can’t scratch it all over the place. 🙂
I put the link to the photo where it said “Website”
My adult cat was recently diagnosed with diabetes. He was having really bad complications related to diabetes before he was diagnosed. The vet said one low-cost, low-maintenance solution that sometimes keeps the diabetes under control is just regulating his diet with prescription food — specifically wet food to get him started. As I travel frequently overnight, my normal fill-a-giant-bowl method won’t work too well.
Diatomaceous Earth good for people and live stock,for control of bugs fleas parasite keeps the flies down good for the chickens to eat.
I forgot it is also good to use in the garden to control bugs.
Regarding your auto waterer. I bought a dog from Walmart for my chickens too. It works great, but with winter coming, what do you do? I saw somewhere once an attachment for a bucket to hang above the dish. They were selling the attachment for the bucket not the bucket. They said to use an old drywall bucket. I can’t find the web site it was on. The attachment was for the hole you drill in the bottom of the bucket, to attach a hose. Have you seen this before?
Thanks,
Jean
Jean, I’m lucky to live in an area where we very rarely get below freezing, so we’ve not had to worry about it too much. There are a LOT of people that do deal with frozen waterers for their chickens on BYC, maybe search / post there? http://www.backyardchickens.com/forum/viewforum.php?id=12
Hi Jean,
Any old light with a 30-40 watt bulb stuck in a pan will work. With the waterer sit on top of the inverted pan. Preferably sit on some bricks so the pan doesn’t sink down into the ground.
Or farm stores sell heated buckets for about 30.00.
If you don’t have a pan to discard or a light…go to a Thrift Store.
I use a heat tape I had on an old 2 gallon paint bucket. Do Not let the wires touch.
Good Luck, Barb
We made a auto water from a 5 gal. bucket with lid and a plastic plant saucer. The holes were different sizes 1 size for water and one size for feed. The feeder works great but the waterer overflowes. We have redone it and it still overflowes. Any suggestions?
Hi Susie Q,
The pan that the waterer sits in has to have a taller ledge/lip then where the hole is for the water to come through. The water will only come through when the water level is below the hole for the water.
The 5 gallon lid is not a good choice. Any other pan that the bucket will sit in would work.
Probably as clear as mud huh? Look at the ones for sale at farm and home stores and you might understand then.
I am sorry….are you turning the bucket upside down?
You have to do that. Keeps the air out. Otherwise the water just runs out.
I used a cottage sheese container once and cut a small V in the lip, turned it upside down in a clay plant base, and it worked great.
Hello,
Barb is right. The waterer made with the 5 gal bucket has to be lid down. You drill smaller holes around the top of the water bucket just below where the lid sets. So that the holes are exposed. You fill the bucket with water put the lid on and place it lid down into your water pan. I have made several of these as well as the feeders. The feeders are done the opposite way.
Good luck!
For keeping the water from freezing:
– a 100 watt bulb over the bucket works (we are near the Indiana/Michigan border). Also gives the hens some heat in the room, since mid-winter they can get frostbite on their combs, and the extra hours of light a day keeps the egg production up.
– a used aquarium heater can be dropped in the water bucket and it is easy to lift out to change water. It works year round, in Northern Indiana weather, use it when it is cold, leave it off if not.
And when you change water in the winter, not much extra trouble to give them very warm water, that you can stand with your hand in it. You like hot cocoa on cold days, warms them up from the inside out too.
To keep food from getting spilled so much:
Put the feeder up off the ground on some boards/bricks about 6-8″ high. To keep them from knocking it off it’s perch, have some thin boards make a lip around the edge. To keep them from jumping up into the feeder, just put a roof over it, about 6″ above the pan,
and a slanted board from the edge of the “roof” to the wall, so they can’t jump up on the roof and defecate from there into the food.
That may be hard to picture so let my try again: if you have an exposed stud on the wall, screw a foot long 2 x 4 to the side of the wall stud. screw a flat piece of wood (size of your pan) to the top of that 2 x 4. Screw 4 1″ x 2″ around the edge of your flat platform. That does it for the tray holder.
Now, the roof. 6″ above the tray holder, on the wall stud, screw a similar 2 x 4 12″ long or so, to the wall stud with a flat board (plywood the size of the tray holder) screwed to the bottom of it.
that forms the roof to keep them from jumping into the feed tray.
last, lean a board at a 45 deg angle from the wall to the front edge of the roof. screw it in place. That keeps the hens from jumping up on the roof and perching there.
Hope that helps, Trent and Jesslyns at their Idaho mini-farm!
Hi every one,
i was looking for chickenfeeders because i plan a short holiday and the chickens will need food while i’m gone .
Now that i found this site i want to make one myself .
This person also made a very nice one http://www.flickr.com/photos/lucdp/5496493598/
I was reading about perfumed kitty litter and indeed it’s dangerous ,my g/f wanted it because it smells good but kitty died and the vet did an autopsy because we wanted to know why,she ate it and died a very slow horrible death ,i never want that in the house again ,just plain sand and replacing it often ,our daughter has 2 new ones and they only need it when they sleep inside during winter.
In winter it’s -20 °C here, then i put my chickens inside the greenhouse,it’s a big one,they clean it and make it ready for spring ,they eat everything inthere ,every bug ,plant or weed + they dump some furtilizer for next year 🙂 .
I never used chemicals or poison in my garden ,nature takes care of it all.
I don’t eat my chickens ,i have them so they eat all my leftovers and i have eggs from them.
For their water i made a pot with the valve of a toilet connected to a hose that is hooked on a 1000L watercontainer that fills with rainwater,it’s easy as it refills with the small floater,i coverd that with a small wooden box so they don’t damage or sleep on it.
I bought 5 “normal”chickens and had 3 of these little english chickens for free,that was 2 years ago.
these little ones can fly and i can’t keep them inside ,thats fine with me because i live in the country with no neighbours,they stay close to the house and breed like rabbits in the hedges ,i found many nests there,now i have around 20-25 i think.
Sorry if my english isn’t perfect ,i try ,i live in CZ,not many people speak english here
It was nice reading and looking at all the things
all have a nice day
Manu
Just thought I would chime in and say I use the pelleted wood bedding as kitty litter. My cats don’t mind and it breaks down to sawdust quickly when dumped outdoors. I also use this for my rabbit litter boxes and in concrete mixing trays set under the roosts in my chicken house. This has saved me lots of time when cleaning out the coop and helps keep the wood shavings in the rest of the coop much cleaner. I then pop the used sawdust in the compost bin or around my fruiting shrubs that like the acidic soil. The wood bedding has untreated wood and a little bit of clay to hold it in pellet form.
ps – To clarify, only the chicken and rabbit laden droppings go into the garden, not the pellets the cats use. This gets dumped in a trench on the opposite side of the property and then buried.
well today is may 2,2012 just keep up the good work that is way os cool.
I had the waterer you show in the pic there but I found it was still always getting dirty. I found and bought some chicken nipples from http://bafxpro.com/5-Pack-Chicken-Poultry-water-nipples-5.htm and installed them into the bottom of a 5 gallon bucket and hung it up. The water now stays clean, the ground dry and my chickens happy. I would highly suggest these to any chicken owner, especially for under $10!
Thanks for so many great ideas!! Love the “frankenfeeder” LOL!! We are new Chicken addicts – our babies are one month old today. Just put them outside yesterday for the first time. I am definitely interested in constructing auto water/feeders!! Hubby picked up a couple food grade 3 gal. buckets on his way to work this morning to attempt a nifty feeder we found here — > http://www.backyardpoultrymag.com/issues/1/1-4/Ray_Kreuziger.html
Still working on ideas for the waterers. Like the walmart doggie waterer…
Thanks again!
Happy Chickens make yummy eggs!!!
Please, may I know in details the ADVANTAGES of full automated battery cage system over semi automatic battery cage system and the DISADVANTAGES of full automated battery cage system over semi automatic battery cage system
Please i would also like some comparison between full automated battery cage system and semi automatic battery cage system